1-Introduction
Creating fine art photographs requires the proper set up. This setup must be practical. For most photographers, this means setting up a home studio rather than renting a location just for photography.
There are benefits to having a home studio. For one, you don't have to go anywhere to do your work. All is there where you live. This saves a lot of time in travel and commuting.
However, there can be negative aspects as well. For one, a home is not a workplace and often bedrooms have to be transformed into workrooms, a process that is not always easy or practical. Space can also be an issue. For example, you may not have enough spare bedrooms, or the rooms that are available may not be large enough.
Natalie and I have faced each of these difficulties and more since we started doing photography full time in 1997. My first home studio was in Canyon de Chelly, in Navajoland. It was very limited in size which meant that living areas had to double up as work areas. We could either print photographs, or cut mats, or package artwork for shipping, or eat and sleep, but not all at the same time.
My second home studio was much more practical. It had 3 separate rooms used for digital processing and printing, for cutting mats, and for framing. The concept was sound: keep each part of the process separate. Yet, the rooms were not large enough to make framing large prints practical. After living and working there 5 years we had used all the space available and we were desperately trying to "push the walls."
We moved to a new location in August 2008. We are still in Arizona but our new home studio is far more convenient. We retained the "3 rooms approach" developed in our previous home studio, but this time the rooms are sized appropriately to process large pieces.
2-The three room concept
I like to think of creating a fine art piece as a 3 step process. The first steop is to process and print the photograph. This part of the process includes many separate steps, but it is essentially conducted on a computer and finalized by the production of a fine art print. The space required is a function of the size of your prints. If you make small prints you don't need as much space as if you make 40" x 50" prints or larger.
3-Image processing and printing
I use 2 computers for my photographic work, one to process, optimize and evaluate my images, the other to print from. That way I have a computer dedicated for printing and this frees my other computer to do image processing on. When I started making a living 100% from photography, I did volume (I didn't know any better then) and I had 3 or 4 computers and printers running at once. I now do quality rather than quantity and this has allowed me to reduce the number of computers to just 2.
I use both desktop and large format Epson Pro printers. The logic behind this approach is that each type of printer does a different job. The wide format printer is necessary for prints above 16" wide. The desktop printer is necessary for printing folios and portfolios because you can stack sheets of paper instead of having to feed each sheet into the printer. This room is also my office and has several desks. On the main desk is a viewing booth, with a calibrated light source, which I use to evaluate test prints.
4 - Matting
The second step in this process is cutting a mat for the print. This is done in the mat-cutting room.
Here the goal is to cut custom mats for the photographs after a final print has been achieved. Because each photograph is cropped differently, the size of the mat opening varies from image to image.
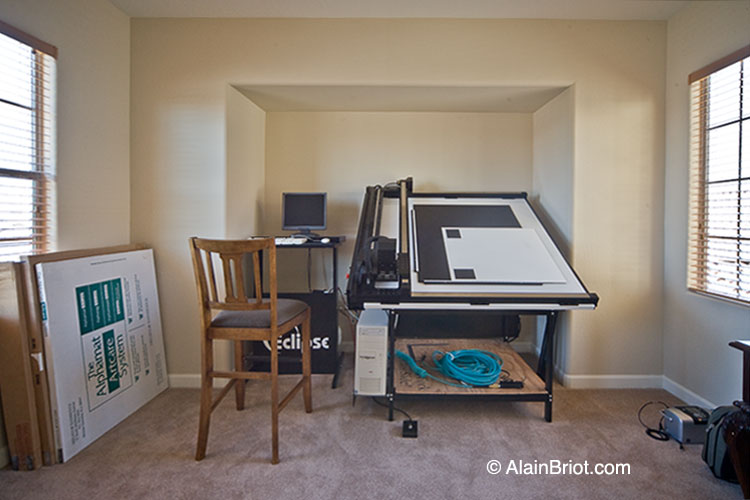
The mats are cut on our Eclipse computerized matcutter. We also have a tabletop matcutter on hand if necessary. The nice thing about the Eclipse is that it doesn't get tired and doesn't cut wavy mats at the end of a long day, unlike us who do (we're not machines...). It is one of our most important pieces of equipment. A photograph of the Eclipse Computerized matcutter is below:
 |
5 - Framing
The third and final part of the process is mounting and framing the photograph. We do this in the framing room.
This is where we assemble the mats and where we dry mount the prints if necessary. We use a dry mounting press. The mounting table is 10 feet long and this is where we do all our mounting and matting. The tools we use, as well as some of our smaller supplies, are stored on 4 rows of shelves located above the work table.
We also use a wall cutter. It is used to cut matboad to size either before or after mats have been cut. It is another of our most valuable pieces of equipment. We also use it to cut backing boards and packing materials for protecting the artwork during shipping.
The framing room is also, as its name implies, where we do all our framing. We also do packing in this room in preparation for shipping pieces to their destination. We keep packing supplies on hand at all times. Packing artwork is both an art in itself and an absolute requirement if you sell your work. Your artwork must make it to its destination in perfect condition, something which is not necessarily easy since artwork is by nature fragile.
Frames and other large supplies are stored in 2 large closets.
This about sums it up for this quick overlook of the process we follow to go from a raw file to a matted and framed fine art photograph. We have followed this approach for over 10 years now, without having the space we have now. This means that regardless of how much or how little space you have, you can adapt our system so it meets the space you have available. You may have to move things around, or you may have to use only 1 or 2 rooms, but it can be done. What matters most is your passion for photography and your desire to do the finest work possible. Keep in mind that planning and organization leads to excellence and that excellence is the goal we aim for.
The last part of the process is displaying the results of your efforts. This is covered in the essay titled Setting up a Home Gallery.
Alain Briot
Arizona, August 2008
Essay and photographs Copyright © Alain BriotAll rights reserved worldwide